Every person equipped with a smartphone takes on average hundreds if not thousands of photos of any type and genre every year, photos that allow us, over time, to bring back memories of a day spent. Given the limited amount of memory in our smartphones, we often tend to download these photos to the hard disk in order to make room for new photos, with the risk of losing all the stored memories in the event of a failure. Fortunately, there is a very convenient and above all free solution to this problem, which can happen to anyone, such as for example Google Photos.
What is Google Photos
Google Photos is the service designed by Google to allow us to store, edit and share our shots. The service has become famous and increasingly appreciated for the possibility of perform unlimited automatic backup of our photos and videos on Google servers.
But Google Photos is much more than this, it allows us to retouch and improve our shots, as well as the automatic and non-automatic creation of albums, films and collages, and the convenient automatic cataloging by subject. Furthermore, Google has announced that machine learning (AI) functions will be integrated into future versions. The service will also be able to recognize documents and automatically transform them into PDFs and will suggest for each photo which adjustments (brightness, contrast) to make to improve our shots.
If you often take photos with your phone, and the time to replace it is approaching, we invite you to consult our updated article on smartphones with the best camera for each price range.
Now all we have to do is show you how to configure Google Photos su Android e iOS to exploit the unlimited automatic backup offered by it. We will also see how to use the web version via using your PC.
Here is a quick index of our in-depth analysis:
- How Google Photos works on Android
- How Google Photos works on iOS
- How the Google Photos website works (PC)
How Google Photos works on Android
Generally on Android smartphones, Google Photos is one of the pre-installed apps (it is part of the Google app package included on every system), and is set by default to back up photos to the cloud. However, if it is not present on your smartphone, find the Google Photos App on the Playstore.
By default the app backs up to high quality (not to the original quality) and only when the smartphone is connected to the WiFi network (to avoid consuming your data connection).
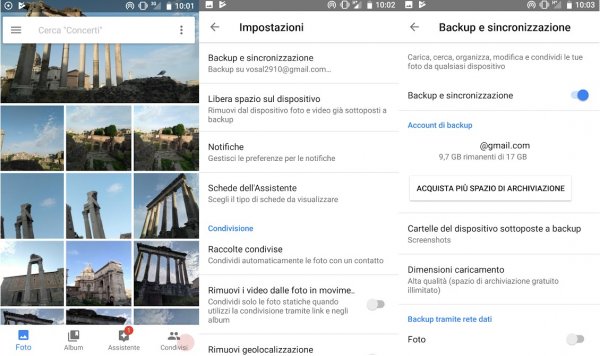
You can change these settings very easily, just go to the appropriate menu. Reaching it is simple, just:
- open the Photos app;
- press on the menu icon with three overlapping horizontal dashes;
- press on Settings and then on Backup and synchronization.
In the menu you can choose whether to upload our photos in High quality or Original. By choosing High quality the photos and videos will be uploaded compressed, but on the other hand you are entitled to unlimited backup. The compression is not very aggressive, and high resolution files are not resized unless they exceed 16 MP for photos and FullHD resolution for videos. This is the default option and is the one we recommend to everyone unless you have specific needs (such as keeping your videos in 4K).
By choosing Original, our photos and videos will be uploaded to the cloud without any modification, but in this case the backup space offered is not unlimited and is limited to what we have available on Google Drive. We don't recommend choosing this option unless you're a serious photography enthusiast, or you don't own a Google Pixel. If you own a Google smartphone, uploading in original quality should be unlimited.
In the same menu you can also choose to back up only photos or videos via the mobile network. It is generally recommended to enable this option only if you have a plan with a lot of data included.
Once the photos and videos have been backed up, they will be available via clients on Android and iOS and the specific web page to which we have dedicated a paragraph.
An interesting function is the possibility of free up memory deleting files that have already been backed up from your device. Just use the Free up space option in the menu, which will identify the photos and videos that have already been saved and can be deleted.
If you are chronically short of memory, and your smartphone supports expansion via card, we recommend that you consult this in-depth analysis dedicated to the offers.
How Google Photos works on iOS
Unlike on the Android platform, Google Photos is not available from the factory on Apple devices, but fortunately theexcellent official client downloadable simply and for free via iTunes.
Google Photos backup is preferred by many users to iCloud backup because it is unlimited and free.
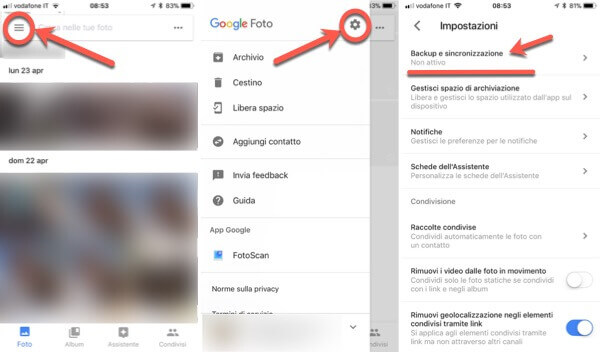
Using Google Photos and setting up backups is also simple on iOS, just:
- go to Google Photos on AppStore, and press Install/Get;
- if you don't have a Google account (or a Gmail email) you need to register, you can do it on this page;
- once installation and registration are complete, you can start the application;
- when you first launch the app it will ask for access to your photos, you need to press on Confirmation;
- then you have to press up on the button Start, and carry out the initial configuration procedure which is short and guided;
- at the end of the configuration there will be a screen in which the beloved automatic backup will already be set, and you will be able to choose the quality (High or Original) and whether to also perform the backup on the data network or not.
The High Quality option compresses your photos and videos slightly, and only reduces their resolution if they exceed 16 MP and FHD. In general, unless you have specific photographic needs, we recommend choosing this option because it offers the unlimited backup. If, however, you prefer Original quality without compression or resolution reduction, you will have 15 GB available for free.
Once backed up, your photos will be safe and you can simply remove them from your device to free up memory.
All photos will remain usable through the client, and you can easily find them on the service website.
How Google Photos works on PC via website
For those who want to use Google Photos from a Windows PC or Mac, we have the possibility to do so via the service's website. This truly convenient solution offers all the features of the app and also allows you to quickly download the uploaded photos.

Accessing it is simple, just go to this page and then log in with the Google account also used on the other terminals.
Once you enter the main page you will see your photos uploaded in chronological order. In the bar on the left there are the entries to go to the pages dedicated to albums, to the assistant, to sharing, or to the page dedicated to photobooks.
Using the assistant you can easily create: albums, photo books, videos, collages and animations.
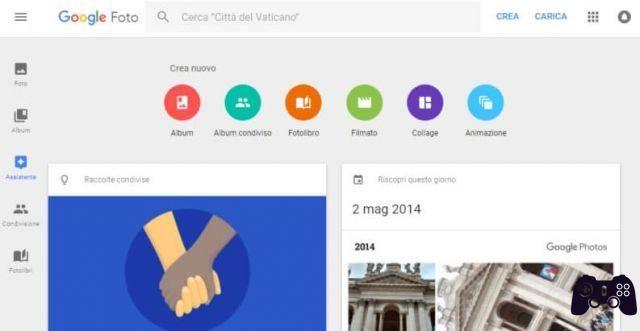
Downloading photos is also really simple, you can do it individually or in groups. On the home page, just: select them, then click on the three dots at the top right and then finally on the Download item. If it is a single photo it will be downloaded as a simple image file, if it is a group of snapshots, a compressed package containing them will be downloaded.
Google Photos, what it is and how it works to back up photos and videos


